

So, today’s post is a little bit different. A couple of weeks ago, I made a bibliophile canvas for my wall, and decided to make a step by step post showing how I made it, incase any of you were intrigued or wanted to try it too.
Along with the step by step, I’ll write down any ways you can get a similar look easier, in case you don’t want to do as much painting, or give other options for materials you could use. Basically – I’ll try and make this as easy as possible to make.
I don’t know whether you guys will like this post or not. I can only hope you do.
So, here’s how I made my bibliophile canvas!

You will need:
– A small canvas (or paper, if you prefer)
– A sharpened pencil & black ink pen
– An eraser
– A ruler
– Acrylic paint
– Paintbrushes
– Water


Plan the design for the canvas. As you can see from the photo above, I planned for mine to have two lines of writing, with a row of books beneath. So with this design idea in mind, draw two lines – making sure the top line leaves a larger space than the bottom, since the word “bibliophile” will be bigger than the description below.


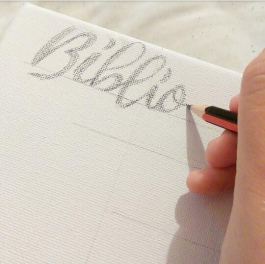
Using the lines as a guide, draw your text onto the canvas. I used a photo reference by going onto the same site I create my blog graphics, and made the design I wanted to draw. With this on my laptop screen, it was easy for me to copy the fonts. If you’re not confident with drawing the fonts yourself, you could always print your design fonts out and stick them onto the canvas later.


Once you’re happy with the text you’ve drawn, erase as much of the guidelines as you can. You don’t have to get rid of them completely, since the acrylic paint will probably cover most of it. This is just a precaution, in case the lines are too dark to cover.


Step four is simply to draw the books on. Again, I had a photo reference (this time from Pinterest), but I basically just drew book spines and page edges, all of different sizes, with some on an angle like they’re propped up.


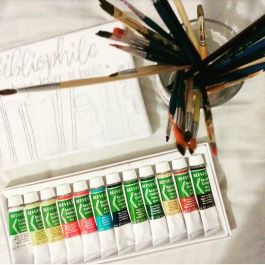
Once your design is all done and dusted, gather your paint together.Acrylic paint is usually best for canvases, and you can use whichever paintbrush you’re most comfortable with. Make sure you have water nearby to clean your brushes in!


Decide on your colour scheme. I went for a pink theme, with my background a pale pink and the book spines a darker shade. But you can go for shades of pink, blue, purple, green, orange or even – dare I say it – shades of grey (that book has ruined colours for me). Or even mix the colours, if you like. Whatever colour scheme you decide to go with, this step is basically…mix the paint! Also TEST THE COLOUR on paper first. You need to make sure it’s the right colour when spread.


Start painting your background! If you can, avoid painting over the lettering, because you need a guide to follow when you paint that in, but it doesn’t matter if you paint over it slightly.
If you skipped over the step of drawing the text yourself, or don’t want to paint around it, like I said before you can print the text out and stick it onto the canvas later.


As you can see from the photo on the left, it really doesn’t matter if you go over the writing a bit. I mean, you can barely see the part that says “huge lover of books”, but there was just enough for me to have a guide to follow. But once you’ve painted the entire background, make sure you paint the edges too!


Paint your details! I painted the book spines first, then went onto the lettering. For the lettering I’d advise using a really small paintbrush, because it can take quite a lot of concentration. But don’t worry if you don’t get it perfect – that’s what the black ink pen is for.
If you printed and cut out the writing instead, this is the stage where you’d stick it onto the canvas.

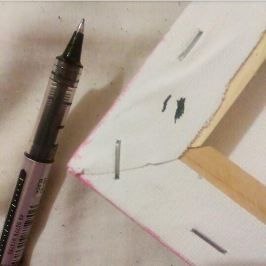
Speaking of the black ink pen – first of all test it out on the back of the canvas first. Sometimes certain inks can bleed on a canvas, so it’s always best to test it first. After a few minutes, if the ink hasn’t bled and gone all fuzzy, it’s good to use. So, use the pen to add the finishing touches. Clean up the edges of your lettering if it’s not as neat as you want it to be. Add the small details on the book spines or draw in the page edges.


I hope you guys enjoyed this post!
It’s very different type, but I figured there’d not been any of my “bookish creativeness” in a while, so it was about time some was brought in.
Let me know what you think!
Do you like the canvas?
Would you think of making your own?
Also – would you like to see more bookish DIY? Maybe DIY bookmarks (especially corner bookmarks)? I’m open to suggestions too! I love doing DIY type things.
Let me know in the comments!
Until next time…

Come and visit me!


Snapchat Username: “frolic_fiction”

You’re so talented and this canvas wall art is pretty! I wish I have the talent and patience to DIY too. Haha.
http://laxsourire.blogspot.my
LikeLiked by 1 person
Thank you so much! ❤ It's weird because I'm a really impatient person until it comes to doing art!
LikeLike
Ooooh it turned out to be so good! Pink is my favorite color so I love it ❤ I also love doing DIY and I'd love to see how you make a corner bookmark. I've been planning to do it for a while but still haven't getting around to it yet… great post 😀
LikeLiked by 1 person
Thank you! And I’ll make sure to do my DIY corner bookmark post as soon as possible then! 😀
LikeLiked by 1 person
this is absolutely gorgeous!! please do more bookish diys.
LikeLiked by 1 person
Thank you so much! And I will do whenever I have ideas!
LikeLike
That canvas is ridiculously cute!!! I love it. I don’t have the patience for DIY stuff, but I’m glad you shared this. 😊
LikeLike
Thank you! I’m glad you liked seeing it!
LikeLiked by 1 person
It looks amazing!
LikeLiked by 1 person
Thank you! ❤
LikeLiked by 1 person
I love bookish DIY, it’s so fun to do and I love getting inspiration from others. I might try out something like this because I love to paint and your canvas looks super cute!
LikeLiked by 1 person
Thank you! Glad you like it, you’ll have to show me a picture if you decide to make your own! (through any social media) 🙂
LikeLiked by 1 person
I will be sure to fo that 🙂
LikeLiked by 1 person
That’s so pretty! Amazing!
LikeLiked by 1 person
Thank you so much! 😀
LikeLiked by 1 person
This is adorable!! I love how the writing on it came out! ❤
LikeLiked by 1 person
Thank you Holly! It took a while to get the writing right so I’m glad you like it! 😀
LikeLike
I’m impressed! It looks so great!
LikeLiked by 1 person
Thank you! 😀
LikeLiked by 1 person
Oh, gosh, that’s so pretty. You must have the patience of a saint! Well, you obviously have talent. If I tried to do this, it would look so crazy! I liked that you showed how you made it. Thanks for sharing with us! 👏👏
LikeLiked by 1 person
Thank you so much!! I only have patience when it comes to arty things, otherwise I’m the most impatient person ever 😆
LikeLiked by 1 person
Well, you def have talent!!
LikeLiked by 1 person
Thank you!!
LikeLiked by 1 person
You’re welcome. 😊
LikeLiked by 1 person
That is soo pretty! I love it.
LikeLiked by 1 person
Thank you!! ❤ 😀
LikeLiked by 1 person
Ahh I love this so much! Such a good idea! I really like DIY/creative type things. You copied out that font so well! And the shades of pink you mixed are so pretty. I hope you do more of these in the future! ❤
LikeLiked by 1 person
Thank you so much Rebekah! Glad you enjoyed seeing this! And I’m so glad the font worked out ahaha 😆 I plan to do more creative DIY posts so let’s just hope I have more ideas in the future! 😀
LikeLike
Omg I love this! It’s so pretty!
LikeLiked by 1 person
Thank you so much!! 😀
LikeLike
This is SO cute! I want one!
Molly @ Molly’s Book Nook
LikeLiked by 1 person
Hahaha thank you! 😀 ❤
LikeLike
This is super cute! I’m going to have to make one of these soon!
LikeLiked by 1 person
Thank you!! 😀
LikeLike
Oh wow! This looks great! I’ll have to try this one day, as DIY decor is my absolute favorite.
LikeLiked by 1 person
Thank you! Let me know if you do end up making your own 😀
LikeLiked by 1 person
This is such a fun post! You’re so talented at calligraphy! I can’t even draw stick people so this makes me insanely jealous haha! I’m also really impatient so this is a bad project for me. 😂 Looks great though! 😍
LikeLiked by 1 person
Thank you! I’ve just gotten proper calligraphy pens to practice properly, so it’s good to know I can do it a bit already 🙂
LikeLiked by 1 person
You definitely can! I would have thought you’d been doing it for much longer! 🙂
LikeLiked by 1 person
THIS IS SO CUTE! I wish I could make something like this but I’m not that good with paint haha
LikeLiked by 1 person
Thank you!! 😀 ❤ You could always just paint the entire canvas and print/stick the images on. Though that might just be even more hassle ahaha 😆
LikeLiked by 1 person
ASHLEIGH, THIS IS STUNNING!
LikeLiked by 1 person
THANK YOU!
LikeLike