
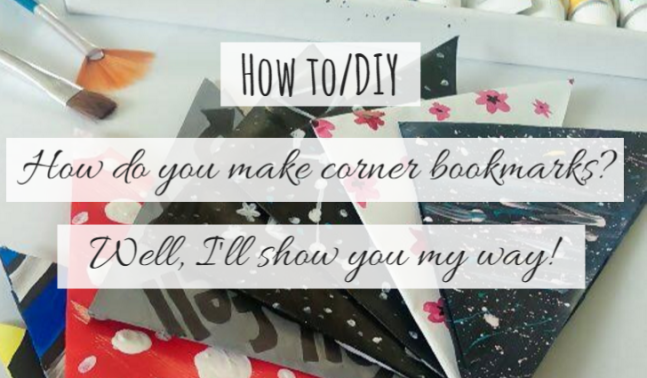
This is probably the post that has taken me the longest to write – ever – on my blog.
Between making the bookmarks, stopping to take photos of each step, waiting for things to dry, cleaning, and actually writing the post…this has been an all day thing. So I REALLY hope you guys like this 😆 A lot of you liked my Bibliophile Canvas DIY last week so my hope is there 😀
So, most of us bookworms have a thing for bookmarks. I mean, we should have one for every single book we own, right? RIGHT?
(All right, maybe not EVERY book. But most.)
Is it a bad thing? I don’t think so. SO I’M GOING TO FUEL THAT COLLECTING CREATURE INSIDE YOU AND LET IT BLOSSOM INTO A BEAUTIFULLY CREATIVE FLOWER.
Yep.

YOU WILL NEED:

Paper or Card
Scissors
Glue (preferably PVA, but most will work)
Ruler
Pencil
FOR DECORATION:
Paint, Brushes and Water
Black pen/or Fine Liners
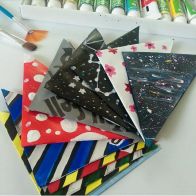
Anything you want to decorate with – coloured paper, washi tape, buttons, ribbons, lace, it’s up to you!

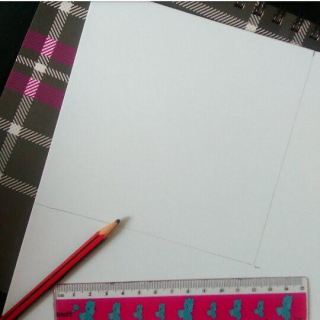
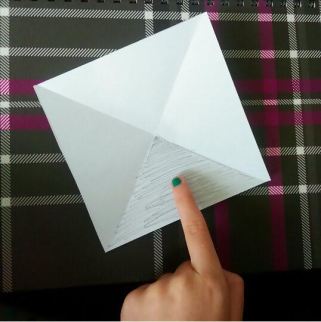
First of all – take your paper, pencil, and ruler. Draw a square where all the sides are 14 cm long. I usually draw mine in the corners of the paper so that I can fit two on one piece of paper.
If you don’t want to paint the background a different colour, feel free to use coloured paper/card!
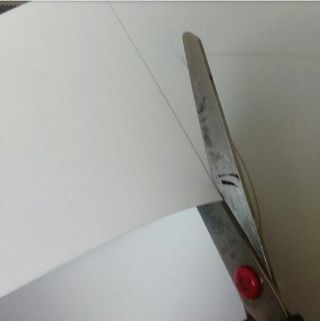
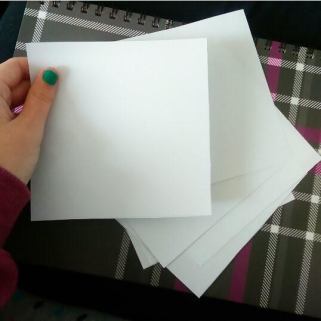
Cut the squares out. I like to cut all mine out at the same time so that I don’t have to keep going back to them, but instead just have a stock ready for me.
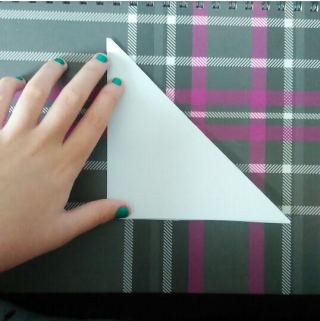
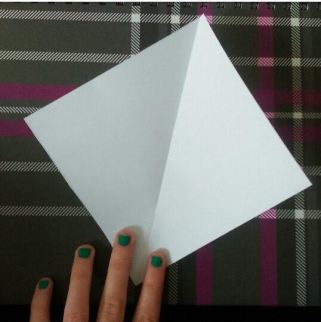
Take the square and fold the opposite corners together to make a triangle. Then open it back up again.
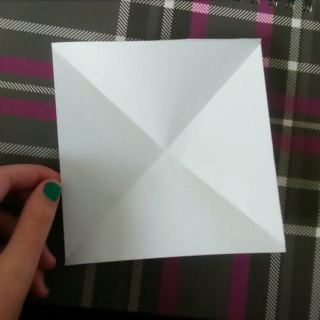
Do the same thing again but with the other two corners. When you open it back up, there should be a cross between all the corners.
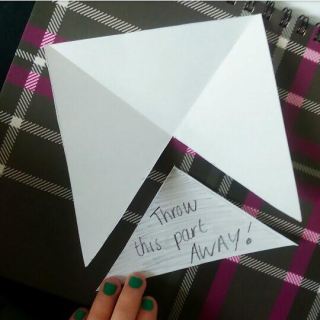
Cut away one of the triangles from the square, and throw that part away. You won’t be needing it. (Also you don’t have to shade the triangle in. I only did that so you could see better in the photo 😆 ) You should be left with a sort of tooth looking shape.
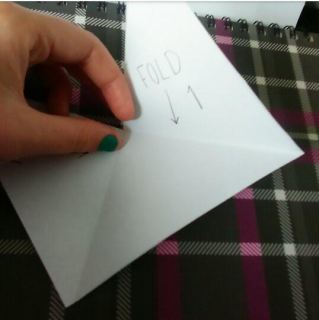
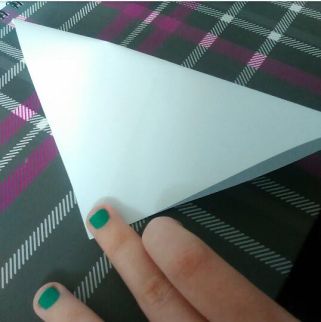
Turn the paper so that the triangle with two others attached to it is closest to you. Fold the right hand triangle back down to cover the middle one.
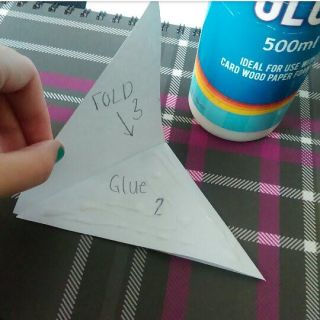
With that folded down, you’ll have this strange arrow kind of shape. You then need to cover the top side of the triangle you just folded down with glue. Once covered, fold the left hand triangle down too. This will stick the top two triangles together (Captain Obvious over here, I am) but leave a pocket between the bottom one.
Hopefully that made sense. I wrote on the paper in the photo to try and help you along!
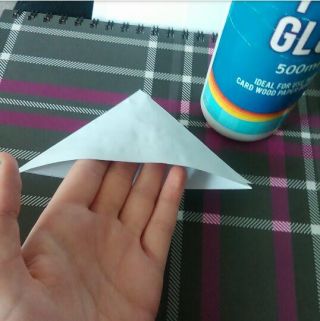

And here’s the pouch. Just make sure you do pull apart the pouch a bit before leaving the glue to dry, just in case some of the glue ran along the edge. You don’t want the opening to be stuck together.
Also don’t worry if the edges don’t match up exactly, like in the image above. You can just cut them down to be even!
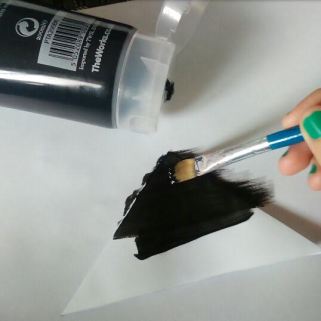
Now you have your shape, you can decorate them how you want! If the glue has left one of the sides a bit crinkly, don’t worry. It’ll soon flatten either during the decorating process or when it’s used inside a book.
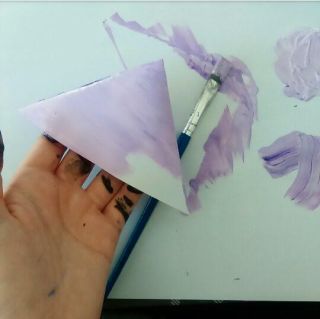
If you’re using paint like I did, I advise painting the background colour of them all first and leaving them to dry before doing the details of the design. You don’t want all the colours to smudge together.
Make sure you paint both sides! You don’t have to design both sides, but it looks good if the background colour continues all the way around. You can either paint one side and leave it to dry before doing the other, or if you’re like me and don’t mind getting your hands messy, you can just hook it over your fingers and paint both sides at once. Just make sure the don’t stick to whatever surface you leave them to dry on. Also, try not to get too much paint along the open edge of the pouch, because they might stick together.
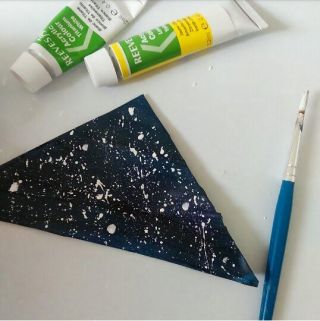
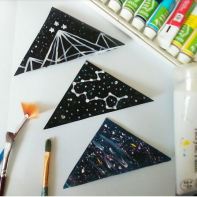
Once the background colour is dry, you can finish your designs! The one shown above is a messy space inspired one I made just by flicking white and light blue paint onto the background. I then dragged my paintbrush through some of the splatters to make them look sort of like comets or shooting stars (or at least, that was the idea). All the designs I made are below.
But this is basically where you get to go on a creative spree. Go mad with the paint. Draw quotes of phrases on with pens. Stick buttons, ribbons, lace on them. Cover them in wrapping paper. Cover them in washi tape (I know I would if I had any). Make animals out of them – there’s LOADS of these on Pinterest if you need inspiration!
And then you’re done! All you need to do now is wait until they’re 100% dry before you use them – you don’t want to smudge paint or glue or something onto your books pages, after all.

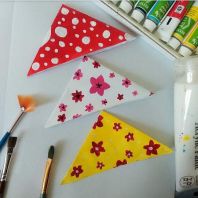
All of these apart from the Hogwarts Houses and “to be continued” were made yesterday. The yellow floral one shown above had problems with the paint (it stuck the pouch opening together, like I warned above) and couldn’t be saved, unfortunately. R.I.P little yellow bookmark.
Did I really just say farewell to a bookmark? Alright then.


So there we have it!
That was my method behind making corner bookmarks!
There are a couple of other ways to make them too, but I’ve always found this one to be the easiest.
I hope you all enjoyed this post! If you decide to make your own, send your photos to me on twitter! I’d love to share them 😀
Which of the designs above is your favourite?
Do you think you’ll be making your own?
Maybe you’ve made them before? Do you follow this method or one of the others?
Let me know in the comments!
Until next time…

Come and visit me!


Snapchat username: “frolic_fiction”

I love this! Thanks for making it so much easier to understand. I will be doing one as soon as I restock on paints. Thanks, Ashleigh! 💕💕💕
Ps.
Especially loved the night court sigil, messy space and the pisces constellation!
LikeLiked by 1 person
Thank you so much!! ❤ YES MAKE SOME AND SHOW ME!! 😀
I especially love those ones too, I think they're my favourites! I was so tempted to do a whole host of the constellation ones, because I painted a whole bunch of constellations above my bed, but I *think* that would've been a tiny bit excessive ahaha 😆
LikeLike
Srsly?? You have a whole painting of constellations above your bed! Been dying to do that since I was a kid!!! Duuuuuuuude 😂😂😂
LikeLiked by 1 person
It’s not as impressive as it sounds, trust me. It’s not like and entire painting. Basically I have these little squares of paper and painted a constellatio onto each one, them just stuck them onto my wall 😆 I think one day I’m going to get one of those huge canvases though and do the whole shebang 😀
LikeLike
These are great, Ashleigh!
LikeLiked by 1 person
Thank you!
LikeLiked by 1 person
OMG these are all so gorgeous!! I especially love the galaxy ones (and the polka dots, of course!). 🙂 I’ll definitely have to try making these soon!
LikeLiked by 1 person
Thank you!! 😀 I must admit, the polka dot one went a bit wrong ahaha 😆 I wanted all the dots the same size but it went wrong so I had to improvise haha!
LikeLiked by 1 person
I’ve always wanted to make these! Now I know! Thank you😁
LikeLiked by 1 person
Glad my post could be of help! 😀
LikeLiked by 1 person
These are so pretty. I loved the Night Court Sigil, “You fell Asleep Here”, Messy Space. To be honest, all of them are beautiful. I’d love to try this, but we’ll see… haha!!
LikeLiked by 1 person
Thank you so much! ❤ Let me know if you do try it!
LikeLiked by 1 person
Oooh I really like these especially the Ravenclaw one 😍 (duuh !) The constellation ones AND the ones with writing, I think I’ll make my own because they’re pretty easy to make ! 😁
LikeLiked by 1 person
They ARE surprisingly easy to make! Make sure to tweet me a photo if you do make your own, I’d love to see 😀
LikeLiked by 1 person
Of course 😊 Though it won’t be for a while because I’m working on my wall of quotes now and it’s taking FOREVER 😂
LikeLiked by 1 person
Oh god I can imagine! I made some of my own and yep, they take forever ahaha!
LikeLike
Never even heard of corner bookmarks until I saw these…these are so creative!
But mine would look like a deranged child made it….
Love these!! 👏👏
LikeLiked by 1 person
I love using them! And trust me, they’re surprisingly easy to make 🙂 Thank you!!
LikeLiked by 1 person
You think that maybe they sell bookmarks like that somewhere? I’m not very crafty…and I like how it marks the page!
LikeLiked by 1 person
I’ve not seen any, but I’m sure there will be an online store somewhere that sells them. I feel like you’d be more likely to find some on Etsy, or stores like that.
LikeLiked by 1 person
That’s what I was thinking. I’m just I’ll-equipped. No paints. No colored pencils. I used to do creative things, but most ended up looking like junk. So I decided to buy creative things instead. 😉
LikeLiked by 1 person
This is a great DIY post! I’m definitely saving this so I can come back to it and attempt my own later. 🙂
LikeLiked by 1 person
Thank you! I’d love to see them when you make some 😀
LikeLiked by 1 person
I LOVE THESE! Especially the ‘I fell asleep here’ one
LikeLiked by 1 person
Thank you!! I love that one too ahaha 😀 Glad you do!
LikeLike
Great tutorial! I see these all over bookstagram and I love them, but I don’t want to spend like $5 on just a simple bookmarks if I bought one online. I totally have to make some of these soon!
LikeLiked by 1 person
Thank you! I love making bookmarks if I can help it, like you said there’s not much point buying them when you can make them yourself 😀
LikeLike
I’ve been meaning to make some book marks for a while now defiantly going to give these a go 🙂
LikeLiked by 1 person
I hope you enjoy making them!
LikeLiked by 1 person
THESE ARE SO CUTE AND PRETTY
LikeLiked by 1 person
THANK YOU! X
LikeLiked by 1 person